- Lightwave
Smokey laser writing in Lightwave 9.6
I was creating a new website for myself, and I wanted some "laser writing", like you'd get if you had a laser shining through smoke drawing patterns (very '80s):
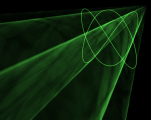
After a bit of experimentation, I came up with a way to do it that doesn't actually involve lights and smoke - and I've done a tutorial on how I did it.
What you do need, though, is an image of the pattern you want to use, and a bit of time.
The pattern
For this tutorial, I'm using a 2:3 lissajous pattern. I drew it using Xara Xtreme, but you can probably use any line-art drawing package to do this. I just happen to like Xara, and it has a nice array of image export capabilities.
This image is actually an 80x80 pixel image of a 0.5 pixel width line when at 96DPI, but I've exported as a 500DPI, which makes it a 417x417 pixel image of a line which is 2.6 pixels wide. The line thickness will give the laser beam its thickness.
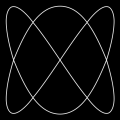
The background colour needs to be black, and you need the line to be white. Leave a thin black border around the outside.
Make a note of the image size - you'll need it when you create the object.
This can be a greyscale image, rather than a full-colour one. We'll be choosing the laser colour in the next step.
The objects
We'll be making two virtually identical objects (they can be identical). One will be an image that will emphasise the shape (think of it as a fairly transparent screen in front of the laser that catches the whole of the pattern). The other will be the smokey laser beam pattern itself.
The flat object
In Modeler, create a simple 2-dimensional box (no thickness) in the XY plane (Front). This needs to be the same aspect ratio as your design. In this case, I've created it 1600x1600mm. It doesn't really matter how big it is.
Note that this can be done using nodes (and my experimentation was done with nodes). I've used the older method for this tutorial.
Then, go to the surface editor, and choose the colour - this will be the colour for your laser. I've gone for a light green colour.
Set the diffuse to 0. If you've not done this before, don't panic - all we're doing is making sure that it isn't affected by any lights.
Next, click on the "T" to the right to bring up the texture. You'll want to use an image map in the Z plane - load in your image. With that done, click on "Automatic sizing" - if you made your box the same aspect ratio, then you don't need to fiddle with the values.
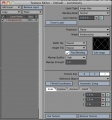
Then, do the same for the transparency - load the image, click "Automatic sizing". However, you'll also need to select "Invert Layer".
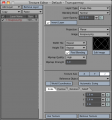
The final thing you need to do is make it double-sided. You don't actually need to do this, but it makes it easier for camera angles and the like (the default view will have the box facing the wrong way, so you could flip it).
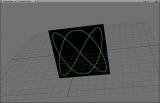
You should now have an object that looks like this:
The smokey object
Make a copy of the flat object, and make the following changes:
Luminosity - set the layer opacity to 2500%. Yes, that's right - well over 100%.
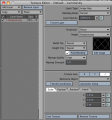
Transparency - add a new procedural layer before the image map layer using Smoky1 procedural type, 100% texture value, and an additive blending mode. You also MUST set this layer to use World Coordinates. If you don't do this, then the smoke effect will look very weird (as I did in one of my earlier experiments).
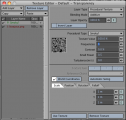
Save this as a new model.
Creating the scene
I won't be changing too many things from the default scene.
Firstly, import the two objects. Make sure you're on frame 0, select the camera and move it to (1.6, 1.6, -5). Make it point to the flat object.
Then, select the smokey object. Move it to Z=-5m (make sure you're at frame 0). Then, go to frame 1, and move it to Z=+5m.
This gives the laser its track - 10 metres. Go back to frame 0, and set the smokey object's size to 0 in all dimensions.
Now, we need to do a little calculation based on how much of a spread we want the beam to have. This can be done a number of ways - I've chosen a very simple method here.
I've decided that where I the smoke to end, it should be 1.737 times larger than the created size (or 2.7792x2.7792m). There is a reason for this (it's basically 10 * sin(10)). However, you can choose a more uniform value such as 2.
Now, you need to decide where you want to put the "screen" that shows the shape (i.e. where to put the flat object).
Go back to frame 0, and place it at the coordinates you want - I've chosen (0, 0, 0), because it's nice and easy to calculate.
This may need to be scaled depending on how far away it is. In my case, it's in the middle (5 metres from the start, 5 metres from the end). This means it needs to have half the scale. If you chose 2, then you don't need to scale it. Because I used 1.787, I need to use 0.868.
If you want it 8 metres from the start, then you'll need to use 8/10ths of the scale of the end point.
Now, open the camera settings, and change these values:
- Antialiasing - set this to 20
- Motion Blur - set this to Photoreal
- Blur length - set this to 100%
- Motion blur passes - set this to 5
Render this frame (frame 0). You should end up with something like this:
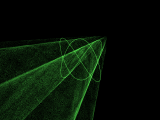
It's a bit rough, but shows promise. Lightwave interpolates the motion blur, but you end up with a fairly sever dither.
Increaing the quality
There's a number of things you can do to increase the quality, the main two from here being the antialiasing and motion blur passes.
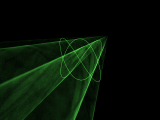
Here's the same scene rendered with Antialiasing set to 40, and motion blur passes set to 10.
And again with 50 and 20.
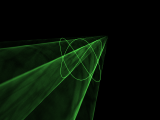
The only downside is the time it takes. On my 2007 Mac Pro (quad-core, 3GHz Xeon), the first was 14.9 seconds, the second was 65.3 seconds, and the last was 2 minutes 46.
As a result, the end quality depends on how long you've got.
Tweaks that can be made
There are a number of settings that can be tweaked.
Opacity - 2500%
Increase this to make the laser in the smoke brighter; decrease it to make it dimmer.
Smoke procedural
You can change the pattern of the smoke (I used the Flakes procedural in a node for a fairly interesting effect). You can also change the scale so the smoke is more widely spread or closer together.
Post-processing
You could render the flat image independantly of the smoke image, and composite the two together. This will speed up the rendering time as the earlier motion passes will only need to deal with smaller objects.
Animation
If you film a laser doing patterns, then you generally end up with some flicker. I've not tried this, but you could introduce a clip map or another (moving) image map that makes both the fixed and smokey objects flicker. And you could make the smoke move (by anmimating its position).
You'll also need to modify the movement of the smokey object so it's linear, and loops.
Multiple lasers
There's nothing stopping you from repeating this several times - probably easier though to use a null object, and move/point that in different places.
Different colours
This should be a no-brainer really. Just change the colour in the objects. You can combine it with multiple lasers too.
Multi-colour lasers
If you create a colour map for the pattern, then you can apply that to the colour texture.
If you've got other objects...
You'll need to make sure that these objects don't cast a shadow (you can also turn off receiving and self-shadows for speed).
Lighting up other objects
You could use a spotlight with an image map centred at the same point in space as the start point of the laser, pointing in the same direction. You would need to carefully calculate the scale for the two objects so they follow the spotlight. Oh, and you'd also need a square image (I'm not sure if you can scale the image in a spotlight).
